Unreal 4 NPC Dialogue System
Most games have some sort of feedback system to let the player know what's happening. These systems can inform the player if they are on the right path, give context to the story, and give help to the player. Dialogue is a great example of one of these feedback systems. For this tutorial I'm going to be showing you have to create an interactable dialogue system in Unreal Engine 4. You can download it for free on their website. For this project you can checkout the source code on my Github.
Project Creation #
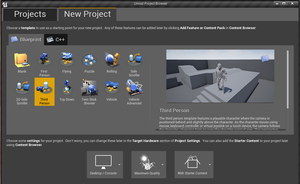
I won't be covering the basics of the Unreal Engine but you should be able to follow along with a very basic knowledge of the engine. The first this we are going to do is launch Unreal from the Epic game Launcher. I'm going to be using version 4.9.2 but this tutorial should work for 4.8+. The first window you'll open to is the Unreal Project Browser. From here click the New Project tab and click the Third Person template. I'm using this template but you should be able to adapt this system to most templates. As for the settings I'm just leaving everything at their defaults.
Structs #
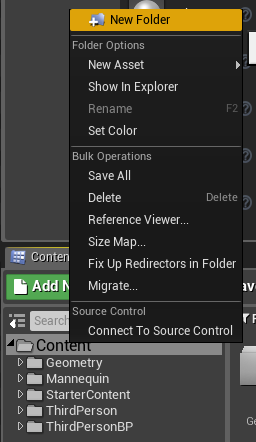
We are going to be creating a system where you can input what each NPC says without having to add any new code or modifying any blueprints after we have finished. For this system we are going to set up two different blueprint structures or structs. Structs are basically just templates that allow you to predefine data so that the engine knows what kind of data to expect when we use the struct. For organization purposes I'm going to create my own folder in the Content folder just so there's just one location for everything I add to a project. To create a new folder just right-click on the Content folder inside the Content Browser then just click on new folder. I'm going to name mine "NPCDialogueSystem". Inside that folder I'm going to create one more folder called "Blueprints" just to keep super organized. This is very important once your projects start to get larger.
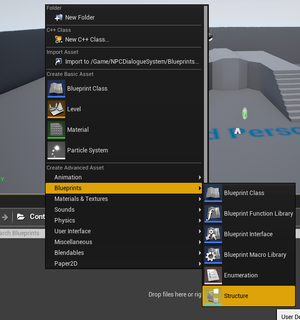
To create a new blueprint structure just right-click inside the folder, find the Blueprints menu, and click Structure. The image should look like this...
I'm going to name mine "Struct_NPCStatement". I always put a little identifier in front of my unreal object to tell me exactly what that object is. So right now we are going to create one more struct and call it "Struct_PlayerResponse". We are creating this before editing the NPCStatement struct because are NPCStatement struct will actually reference our PlayerPresonse struct. Before we start editing the structs go ahead and click the Save All button in the Content Browser which will just make sure that we can call the PlayerResponse struct inside the NPCStatmenet struct. We are going to now set up our NPCStatement struct.
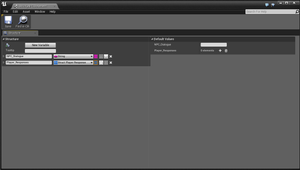
To start editing it just double click on the file. There should already be one variable under the Structure tab label "MemberVar_0". We are going to first change the name of the variable to "NPC_Dialogue" then click on the menu next to it that says boolean. We'll want to change this to string. A string is just how you represent text in a programming environment. This variable is going to hold one line of what an NPC will/can say.
Now we need something that will tell the engine what the player can say in response to the NPC. For this we are going to create a new variable by click the New Variable button. Let's rename this variable to "Player_Responses" and we are going to set the variable type to "Struct Player Response". You'll have to search for this after you click on the variable type menu. The last thing we need to do is to click the square next to the variable type menu. Clicking this button sets the variable to an Array. You can think of an array as a container for multiple variables of one type. In this case it's the type of Struct_PlayerResponse because we want to give the player a selection of different responses. After this is done your NPCStatement struct should look like this...
Close that window and open the PlayerResponse struct so that we can set that up. For this we are going to need two variables. The first variable is going to be a string called "Player_Response" and it will be a String type.m This is going to be the text that will be shown when the player picks this response. The second variable is going to be an Integer type called "Go_To_Statement". When we actually put together the NPC blueprint this will allows to select what NPCStatement should be shown after a player picks this response. When this is done your PlayerResponse struct should look like this.
Widgets #
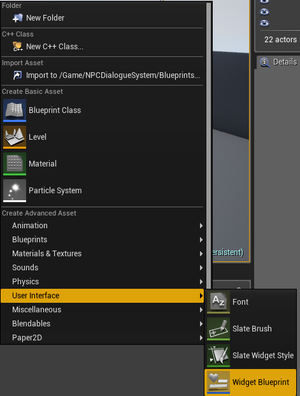
To show our text in the world we are going to use a thing called a Widget Blueprint. Widget Blueprints are normally used to create user interfaces (UI) or 2D text/images in the game. For our system we are going to use two Widget Blueprints to show the text of the player/NPC talking and to show the possible player responses. To create a Widget Blueprint right-click in the Content Browser, hover over the User Interface menu and then select Widget Blueprint.
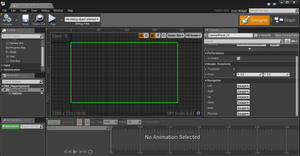
Go ahead and create the two different Widget Blueprints and name them "WB_DialogueText" and "WB_PlayerOptions". Open up the DialogueText blueprint by double clicking on it. What will open up is the Designer view. This view allows you to create really complex and reactive UI systems. Our needs are much simpler so we won't have to do as much. The first thing you want to do is click on the button that says Fill Screen and set it to Custom then set the Width to 500 and the height to 200. We don't want our text to cover the entire screen but just hover over the heads of our player and NPCs so this size should work.
The next thing we need is a way to show text. For this look for the Palette tab and under the Common header you should see an item called Text (not Text Box). Click and drag this into the dashed rectangle you see in the Designer view. This will add a Text Block to your view. You'll want to drag the white diamond corners and resize the Text Block to fill up your whole dashed rectangle. The next thing you want to do is move the anchor points. The anchor is the large sun looking object in your view. If you click and hold the center of the anchor you can move it to the bottom middle. The anchor controls how the text will resize when view on different screens. What we are telling the text to do is follow the middle bottom of the canvas panel when it is resized.
Now if you look over to the right hand side you should see a tab called Details. The details panel is where you can change how the text is viewed. The first thing we'll do in the details tab is change the name at the top to "Dialogue". Right next to that there is a check box called "Is Variable". We'll want to check that on so that we can change the text from our NPC and player blueprints. If you scroll down a bit you'll see the Appearance header. Under this you can change what color the text will show up as. What you set it to now is what how the player text will show up. I set mine to a blue color. You can also change the font and font size if you choose but I'm just going to leave mine alone. One final thing you need to change is the the Justification. Click the middle icon next to Justification to center the text. Finally just delete the Text under the content section so that now text shows up till we tell it to. Now make sure you click save and compile at the top. After you are all done it should look like this.

Now let's open the PlayerOptions widget. This one is going to similar to the Dialogue widget we made previously. The big difference here is that we are going to keep it filling the entire screen because we want the options to show up at the bottom of the screen. So the first thing we do is drag a text object into the designer. You'll want to resize it so that it fills up say the bottom fifth of the screen. Then we need to drag each corner of the anchor to it's appropriate corner. When we set the anchor points to the corner we are telling the text box to completely resize when the whole screen resizes to keep itself inside the screen space. Once that is done go over to the Details tab and rename the text object to "Options" and click "Is Variable". Then go and set the color you want it to show up as, the font size and type, and set the justification to center. Click Compile and Save and you are done setting up the widgets. Here is the PlayerOptions Widget.
Player Blueprint #
The next thing we are going to do is make it so that the player can say things. We are going to modify the Player Blueprint class Unreal gives us in the Third person template. To find this blueprint find the folder called ThirdPersonBP in the Content folder. Inside that folder there is a folder call Blueprints and inside that folder there is a blueprint called ThridPersonCharacter. Double click on that to open up the ThirdPersonCharacter blueprint.

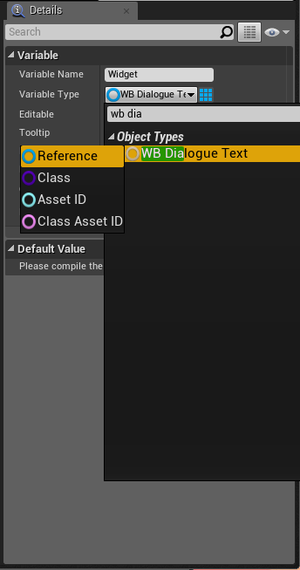
A blueprint is a set of code and objects that can just be dragged into the world. When you open the Third Person Character blueprint you see the Event Graph tab. Inside the Event Graph there is already a few snippets of Blueprint code that comes with the template. This initial code controls how the player moves in the game world. We are going to add some code that allows text to show over the players head when we want it to. The first thing we are going to do is add a variable. To do that find the Variables panel on the left side. Click the plus(+) button and you should see a new variable pop up. Name this variable Widget. It will be the Widget Blueprint we created previously. We need to tell Unreal that we want to store a Widget Blueprint in this variable. To do that we click on the variable we just created. To the right you should see the details panel. In this panel there should be a Variable Type. Click this and search for WB Dialogue Text. Once you find it click on it then click on Reference.
Now we can call this variable in our code to get and set the widget. The first thing we need to do is actually create an instance of our widget to be shown on the screen. We are going to create a function for this to keep things organized. To create a function search for the Functions Panel on the left side and click the plus(+) next to it and a function will pop up. Name this CreateWidget. The first thing we need to do is drag out a line from the Create Widget pin. When you release your mouse you'll be able to search for a function to call. We are looking for function called "Create Widget" but it will be under the User Interface menu. When you click on it you'll see the function says "Construct NONE". We want it to construct a dialogue text widget for us so click on the menu next to Class in the function and select WB_DialogueText. The title of the function should change to "Create WB Dialogue Text Widget".
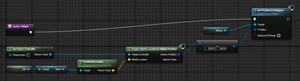
We need to set our Widget variable to the output of the Create WB Dialogue Text Widget function so drag our Widget variable from the variables to the Create Widget blueprint view and click on set. Drag the white arrow from the Create WB Dialogue Text Widget to the Set function and then drag the blue pin into the blue input pin of the set. After that we need to add the Widget to the viewport so it actually shows up. Drag out from the set and search for Add To Viewport. Set the target as the blue output pin from the Set function. We then need to make the widget hidden because we don't want to see it till we talk. Drag from the add to viewport and search for Set Visibility. Once that's create make the target the blue output pin from the Set function and set the In Visibility to Hidden. The last thing we need to do is set the size of the widget. Drag out the blue output pin from the Set function and search for Set Desired Size in Viewport. Set the output pin from the Set Visibility function into the white arrow input of the Set Desired Size in Viewport function. Then set the size of X to 500 and the desired size of Y to 200 just like we did in the Widget Blueprint. The final function should look like this...

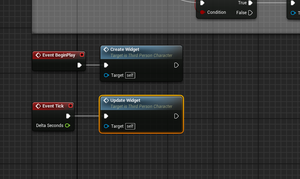
To actually call this function go back to your Event Graph tab. Right-click in the graph and search for Event BeginPlay. This gets called when the game starts. So let's drag our CreateWidget function from the Functions panel to the left and place it in the Event Graph then just hook it up to the Event BeginPlay.
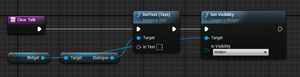
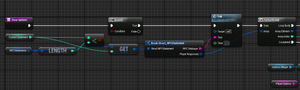
For our next function we need to actually show and set the text. Create a new function called Talk. We need two inputs for this function: What to Say, and how long to say it for. To do this click on the Talk node. In the Details panel there is a section called inputs. Click new twice which adds two new inputs. The first input should be called Text and should be set to a String. The second input should be called Time and be set to a Float. A float is just a number with a decimal point which is useful for time. You'll see two output pins show up on the Talk node. So the first thing we want to do is set the text of the widget. So grab your Widget variable, drag it to the graph, and click on get. From here drag out from the Widget variable and search for Get Dialogue. This is the text from our blueprint. Drag out from the Dialogue pin and search for SetText (Text). This function sets the text for us so all we need to do is drag the Text pin from our Talk node in the the In Text pin. Then make sure the white arrow from Talk is going into the SetText. The next thing we need to do is make the text visible. Drag out from the Widget variable again and search for Set Visibility. Connect that to the white arrow output of SetText and make sure the In Visibility is set to Visible.
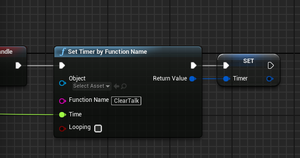
Finally we need to create a Timer to set the text to disappear. We haven't created that function yet but we will. We need to create a variable to hold the timer first so that we can clear it if we activate talk multiple times in a row. So create a new variable, name it Timer, and set it's type to Timer Handle. Drag out from Set Visibility and search for Clear Timer. Then drag the Timer variable into the graph, click get, and connect it the the Clear Timer function. From the Clear Timer function drag out and search for Set Timer by Function Name. Drag the time from our Talk node into the time of this function. Then in the Function Name type "ClearTalk". That's it for this function. It should look like this...

Lets go ahead and create the ClearTalk function. So create the function like we've done before and make sure to call it ClearTalk. This function will be similar to the Talk function but we don't need any inputs and we need to set the visibility to hidden for the widget. So drag the widget variable in, click get, drag out from it and search Get Dialogue, and then search for SetText. Leave the In Text blank because we don't want to show any text. Then drag from the Widget variable again and search Set Visibility and set In Visibility to Hidden. That's it for this function.
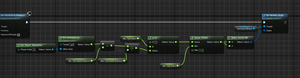
The final function we need is to update the text widget location so that it's always above the player. To do this create a new function called UpdateWidget. We need to figure out where the player character is so right-click, search for This, and click Get a reference to self. From that drag out and search for GetWorldLocation (Mesh). From that node drag out and search for Project World Location to Widget Position to get where we need to put the widget. This node needs a Player Controller so drag out from the Player Controller input pin and search for Get Player Controller. So now we have the screen position but we don't want it right on top of the character, we want it above. So drag out from Screen Position and search for - and then select Vector2d - Vector2d. Set the X to 250 and the Y to 600. We subtract because for most games 0,0 starts in the top left corner. Now we need to set the Widget location so drag the Widget variable in and select get. From the Widget drag out, search for Set Position in Viewport and then connect the out put of our vector2d - vector2d function into the Position of the Set Position in Viewport. Then finally make sure to turn off Remove DPIScale.
To actually get this update to happen go back into your Event Graph, right-click, and search for Event Tick. This function is called every game update. So drag in our UpdateWidget function and connect it to the Event Tick. Make sure your compile and save. The player can now talk and your Event Graph should look like this.
NPC Blueprint #
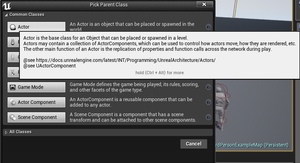
Now that we have our structs set up and the player can talk we can actually start creating the NPC blueprint that will be used inside the engine. To create one right-click inside the folder and click on Blueprint Class. A menu called Pick Parent Class will pop up. For this we will just click on Actor because for this tutorial our NPC character won't be controlled by any controllers.
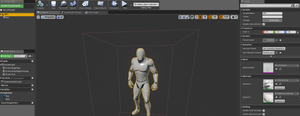
Name the blueprint BP_NPC and then double click to open it up. We are going to change the components which are the physical parts that make up the object. In this case click Add Component and select Skeletal Mesh. Call it NPC then drag it on top of the DefaultSceneRoot to make the Mesh the Root node. To show an actual NPC click on the NPC component and look over at the Details panel. Look for Animation and change the Anim Blueprint to ThirdPerson_AnimBP. Then look for Mesh and change the Skeletal Mesh to SK_Mannequin. This should make the default Unreal character show up. The next component we need is a Box Collision to see if the player is near the NPC. Click on Add Component and add a Box Collision. Resize and move the box to be about twice as big as the NPC.
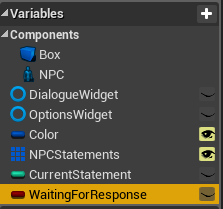
So now we need to add a few variables. One is going to be a Widget just like the player because the NPC needs to talk to. Go ahead and make a Widget variable but name it to DialogueWidget because we'll need two widgets and set it's type to a reference to WB Dialogue Text. Create another variable, name it OptionsWidget, and set it's type to a reference to WB Player Options. The next variable we are going to create is a variable to hold what color you want the NPC text to be. Create a variable and name it Color and set it's type to Slate Color. We want to be able to set this when where in the level editor so we need to make the variable public. To do this click the little icon next to the Variable name in the Variables menu. It should turn into an eye which means we can edit it inside the editor. The next variable we want is the variable to hold the NPC Statements. Create a new variable and call it NPCStatmements. Set it to public by clicking the eye icon. Then set it's type to Struct NPCStatement and finally click the box next to type to make it an array. This will hold all our NPC and player text. We need a few more variables for various functions we'll create. We first need a variable called CurrentStatment that's type is an Int. This will hold which statement we are on. And finally we need a variable called WaitingForResponse that's going to be a Boolean which means it will hold the value of true or false. This will let us know that the player should respond. You variable set up should look similar to this.
Let's get some functions going. We'll get the easy ones out of the way first. Most of the text functions will be similar if not the same as the player text functions. First create a function called CreateWidgets. The first node we'll create from the Create Widgets node is a sequence. So drag out and search for Sequence which should be under Flow Control. We are using this because we have two widgets to set up. For the first pin you can copy and paste the Create Widget function from the ThirdPersonCharacter. The only thing you need to change is make the Set into a DialogueWidget set instead of just a Widget. We are going to add an extra step to the Dialogue Widget creation and that is setting the color of the text. To do this drag out the pin from the Set function and search Get Dialogue. From the Dialogue pin drag out and search for Set Color and Opacity. Connect it to the Set Desired Size in Viewport and drag the Color variable from our variables into the In Color and Opacity. Then off the second pin in Sequence drag off and search for Create Widget. Set the class for this to WB Player Options. Drag our Options Widget variable in and click set. Drag both output pins of the Create WB Player Options Widget into this. Then we need to drag this into an Add to Viewport function and a Set Visibility Function. We don't need a set size because it fills the whole screen but do make sure the set visibility is set to hidden. The final function will look like this...
Go back to the Event Graph and hooked the Create Widgets function up to the Event Begin Play. The next function we'll create is the Talk function. And as you probably guessed it's almost the exact same as the player Talk function except it uses the DialogueWidget variable. And since I forgot we need to create a Timer variable that is the type of a Timer Handle.

Now we'll create the ClearTalk function. Go ahead and create it and just copy the function from the ThirdPersonCharacter.

The next function we'll create is the UpdateWidget. This will also be exactly like the ThirdPersonCharacter. We will have to change what is getting sent into GetWorldLocaiton. For that we will just drag the NPC from the Components and attach it. So here's that function...
Now just hook that up to the Event Tick in the Event Graph.
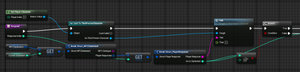
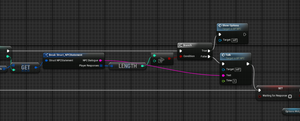
Now we will create a new event that will show the Options for the player. Create a new function and call it ShowOptions. The first thing we need to do is drag in both the NPCStatments variable and CurrentStatement variable. Make sure click get on both of them when you drag them in. We first want to make sure the CurrentStatement is less than the Length of the NPCStatements because that means we actually have something to show. Drag out from the NPCStatements and search for Length. The drag out from the Current Statement and search for < and connect the other input of < to the length. Drag out from that and search for branch. Connect that branch to the Show Options Node. If the true on the Branch does get called we know that there is text to show. Drag out from True and search for Talk. To get the text we want to show drag out from NPCStatement and search for Get. For the other input to Get connect the Current Statement variable. From the get drag out and search for Break Struct_NPCStatement. Then drag out form NPC Dialogue to the Text of Talk. You can set the time to what ever you think is good. I'm going to set it to 3 which should be enough time for short phrases.
Now we need to show the player's possible responses. Drag out from the Player Responses pin and search for ForEachLoop and connect that to the output of Talk. The ForEachLoop will run once for every item in Player Response. We want to take the player responses and add them to the OptionsWidget. To do this we are first going to create a Local Variable which is located under Variables. A local variable can only be seen inside the function. Create a new one called PlayerOptions and set it's type to String. We want to show the number of the option then the text of the option for each option. For the number we drag out from Array index and search for + (integer + integer). We add one to the number because Arrays always start at zero. Then drag out from that and search for BuildString. This will let us make a string that includes all the responses. On the Append To Input drag in the PlayerOptions local variable. We want to keep adding each option to the previous. For the Suffix we need the actual player response.
First drag out from the Suffix Pin because we need to add a . and space to the options. Then to get the player response drag out from the Array element and search Break Struct_PlayerResponse. Drag the Player Response pin into the B pin on Append. Then type ". " without the " in the A spot. And finally make sure to put a space in the Prefix spot. Take the output of this a drag it into a Set function for the PlayerOptions and connect that Set to the Loop Body arrow in the ForEachLoop function. This will build our PlayerOptions string. Finally we just need to set and show the player options. Drag in the OptionsWidget and click get. From that drag out and search Get Options then drag out and search SetText. Connect that to the Complete arrow of the ForEachLoop and set the InText to the PlayerOptions variable. From there drag out from the OptionsWidget and search Set Visibility and connect that to the SetText arrow. Make sure the In Visibility is set to Visible. Finally drag in WaitingForResponse and click set. Then Connect that to Set Visibility and make sure the check box is checked.
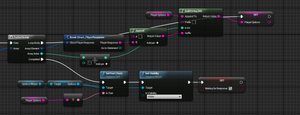
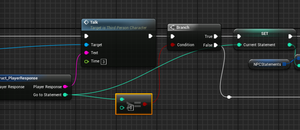
The last function we need to make is a function called Respond which will be called when the player chooses which response they want to give. Create the Respond function and give it one input that's called ResponseIndex and it's type set to Integer. We need to have the player talk first so drag in NPCStatments and CurrentStatement and click get for both. Drag out from NPCStatment and search for Get. Connect the Current Statement variable to the Get input. From the Get drag out and search Break Struct_NPCStatement then from the Player Responses drag out and search Get. Connect the Response Index into this then drag out and search Break Struct_PlayerResponse. This it the response we want to show. To get the player to say it right-click and search Get Player Character. Drag out from that and search Cast To ThridPersonCharacter and connect that Node to Respond. Drag out from the Cast node and search Talk and set the Target as the Third Person Character pin from the Cast Node. Then set the text as the Player Response pin and set the time to what ever you think is good. This will have the player talking.
Now we need to see we should show more NPCStatements. Drag out from the Go to Statement and search >=. We want to check if it's greater than or equal to zero so we know we should go somewhere. Drag out from that and search for Branch and connect that to Talk. First we'll handle the False which means we are done talking. So drag in WaitingForResponse and click set. We need to say we aren't waiting anymore because we are done talking. Connect that to False and make sure the check box isn't checked. Now drag in the OptionsWidget and click get because we need to hide it. Drag out from it and search Set Visibility, connect this to the Set, and make sure it's In Visibility is set to Hidden. Now if it's true we first need to set the CurrentStatement to whatever the player response dictates. Drag in CurrentStatment, click set, and attach it to True. Drag the Go to Statement pin into the Current Statement Set pin.
Now we need to check if there are options for the next NPCStatement. So drag NPCStatement in again and click get. Drag out from it, search Get, and connect the input of that to the output of the Set Current Statement. Drag out from the Get, search Break Struct_NPCStatment, and then drag out from the Player Responses and search Length. From that drag out and search > so we can check if it's greater than zero. Drag out from that and make a branch that is connected to the Set of Current Statement. If it's true all we need to do is call Show Options so drag that in and hook it up. If it's false we need to have the NPC say the line and then not expect a player response. So drag out from False and search Talk. Set the Text to the NPC Dialogue from when we Broke the Struct and set the time to what ever. Finally drag the output of the Talk into the Set of the Waiting for Response that we already made.
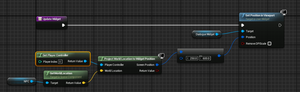
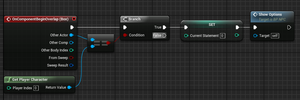
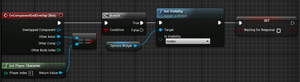
Now we just have to hook everything up in the Event Graph of NPC. First click on the Box Component and then right-click on the event graph, and search for AddOnComponentBeginOveralp. Right-click and search Get player Character and add that to the Event Graph. Drag out from the Other Actor pin on the Overlap Event, search equals, and then connect the Return Value of Get Player Character to the other input pin. From that drag out and create a Branch that's attached to the OnCompoenentBeginOverlap. Drag in the CurrentStatement variable and click set. We want to set the CurrentStatment to zero when we begin talking. Now connect that to the True output and connect the output of the Set to ShowOptions. This will show the NPC text when you walk near it.
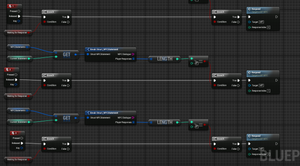
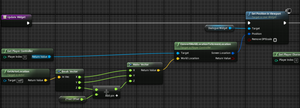
Now to just handle the responding. Now I'll admit this isn't handled in the best way but it does work. Right-Click and search Input Key 1 and add that event. This is called when they player presses 1. So now drag in WaitingForResponse, click get get and drag out from that and make a branch. Connect that to the release of the 1 Event. Now we need to check that we can press that button so drag in and get NPCStatement and CurrentStatement. Break the struct and then get the length of the Player Responses and check if it's >= to one. Create a branch from the >= node and connect that to the True of the last branch. From this True call Respond with a Response Index of 0. Now this will only with one response right now so we need to copy and paste it however many options we want to have. I'm going to do it two more times for a total of three max options.
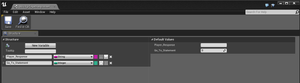
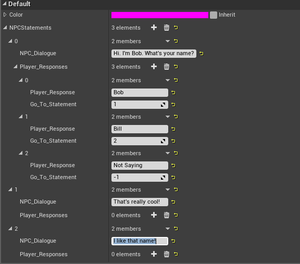
Now one last step to actually getting input to work. Click on BP_NPC(self) under Component and go to the Details panel. Under Input change Auto Receive input from disabled to Player 0. Now I'll show you how to add an NPC to your game. Close the blueprint window and drag a BP_NPC from your Content Browser into your level. Now if you click on it you should see Color and NPCStatements under Default. The color is what ever you want the NPC text color to be. Now to add a conversation just click the plus(+) next to the NPCStatmentes. Now type what you want the NPC to say in the NPC Dialogue. To create options for the player just click the plus(+) next toe the Player Responses. Inside that you can set what the player will say. The GoToStatement should be set to what NPCStatement you want to go to when the player chooses that option. Under NPCStatments you can see a 0 which is labeling the NPCStatement. If you add more statements that number will grow and you can have the player go to any of those. If don't want the NPC to respond to the player just put -1 as the GoToStatement. Here's an example.
You could go a lot of different places from here by cleaning up the code and adding new features. You could have the responses matter by just adding simple branch checks to see what response the player gave. You could also create children blueprints to use this system as just a starting point for something bigger. I hope you enjoyed this tutorial. Feel free to toot your questions to @Cxsquared.
Year After Edit #
This tutorial was originally written at the end of 2015, but recently it was brought to my attention that my code wasn't actually fully working. Luckily there's an easy fix for this. The part that is broken is the NPC responses. Currently the NPC won't give it's response after you respond to it. This is caused by not sending the NPC text response to the actual Talk function. So to fix this just go into the BP_NPC, then go to the Respond function, and finally, near the end of the function, connect the NPC Dialogue pin from the Break Struct_NPCStatement and connect it to the Text pin in the Talk function leading from the False Branch pin.
Going back and fixing that bug led me to fix a few other minor things. Here's a list of all the things I've fixed.
The timer in the Talk function of both the NPC and Player blueprints don't actually reset because we never set the Timer variable to fix this. Simply go into each function then at the end create a Set Timer node and connect the Return Value from the Set Timer by Function Name into it.
I changed a compare conditional in the NPC Respond function to allow you to go back to the beginning of a dialogue branch. This fix is done by changing the Greater Than(>) conditional on the first Branch statement to a Greater Than of Equal To(>=).
I reset the player options and hide them when you leave the Overlap box. This is done by adding a OnComponentEndOverlap with the Box on the BP_NPC. From there Use a Branch to compare the Other Actor to the Get Player Character to make sure they match. Then call Set Visibility on the Options Widget with a value of Hidden. And then set Waiting For Response to false.
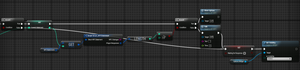
And the last thing I did was clean up the NPC Text widget placement. It was really bad when I first made this tutorial a year ago. Now the text should stay centered above the NPC players at all angles and I added a little extra flair by scaling the Text widget down the farther the player gets away from the NPC. I started by adding a few Float variables: ZTextOffset with a default value of 130, Min Text Scale Distance with a default value of 10, Max Text Scale Distance with a default value of 250, and finally Min Text Scale with a default value of .5. Now go into the Update Widget function in the BP_NPC and first replace the Project World Location To Widget Position with the function Convert World Location To Screen Location. Use the Get Player Controller for the Target pin. For the World Location pin first make a Get Actor Location pin and then Break the Vector output. Take the Z pin from that and add the Z Text Offset to it and send the X, Y, and Z values into a Make Vector node and use this value for the World Location pin.
For the scaling trick call Set Render Scale with the target of the Dialogue Widget variable. For the Scale input first create a Get Distance To node. The Target should be self and the Other Actor should be a Get Player Character node. Then subtract the Min Text Scale Distance value from that and then divide the Max Text Scale Distance from that. Create a Lerp node with the A value set to 1, the B value set to the Min Text Scale variable and the Alpha value of the Get Distance To math stuff. Finally create a Clamp node and connect the Lerp output to the Value input pin and have the Min set to the Min Text Scale variable and the Max set to 1. Send that value into the X and Y of Make Vector 2D and send that output into the Scale pin.
Thanks to the readers who pointed out my errors. I always enjoy helping other game developers out so if you have any questions for find any problems feel free to leave a comment bellow, send a toot to @Cxsquared, or leave me a message on my contact page.
WebMentions
You can respond to this by: favoriting, boosting, or replying to a toot that mentions it; or sending a webmention from your own site to the current url
disqus_i2ZZocr0JF •
Ik this is old but this helped me with my game. Thank you.
bachokurtanidze •
so I have two problems
At first i can't find Clear Timer by handle and
I can't connect self reference to getworldlocation
got any tips?
seamusdoyle •
Hey! I followed your tutorial and it sorta works? I can walk up to the NPC and talk to them, but I cannot see what they have said, only the options. And no matter what key I press, I can only say Option 1
Any idea as to what I've done wrong man?
Regards
cxsquared •
You should make sure your text widget is set up correctly. Make sure the NPC update function is setting their text in the correct location. And for your responses make sure you are setting the correct response index for your respond functions.